
How to Connect AutoCount AgileX to Pixalink
How to Connect AutoCount AgileX to Pixalink
What Is This?
Connecting AutoCount AgileX links your sales and member records to your Pixalink loyalty program. Once linked, your customers and their spending flow into Pixalink on their own. You stop typing the same records into two places, and your points stay correct.
Real-Life Example
Ahmad runs Kopi Corner, a busy cafe in Bangsar. He already keeps his sales and members in AutoCount. Every morning he retyped new customers into Pixalink by hand, and often missed a few. After connecting AutoCount to Pixalink, his members and their spending now appear on their own. He can also send reward vouchers straight to his counter. His points always match his till, so nobody argues over a free coffee. Now Ahmad spends his mornings making drinks, not copying names between two systems.
How to Set It Up
Your Pixalink onboarding team performs this setup for you. The connection settings live in Pixalink's internal panel, not in your Admin Panel, so there is nothing here for you to switch on yourself. What you need to do is send your Pixalink contact two details, and they will do the rest — usually in a few minutes.
The two details are your web address (Base URL) and your API Key. These come from AgileX, your AutoCount API connection provider — not from the AutoCount software itself. If you do not have them yet, contact AgileX to request your connection details.
This is what your Pixalink contact does with them, so you know what to expect:
-
Switches on Enable POS integration module, then chooses AutoCount AgileX from the Pos Provider list.

-
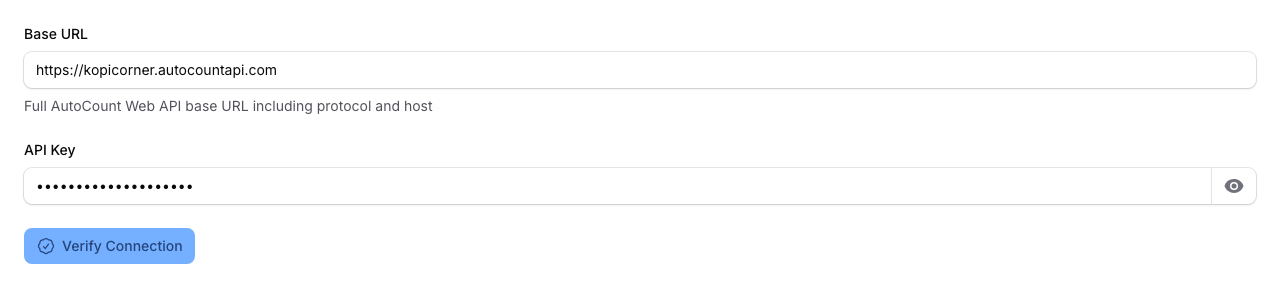
Enters your Base URL and API Key in the two boxes shown.

-
Clicks the blue Verify Connection button below the details to test the link, and waits for a Connection Successful message.
-
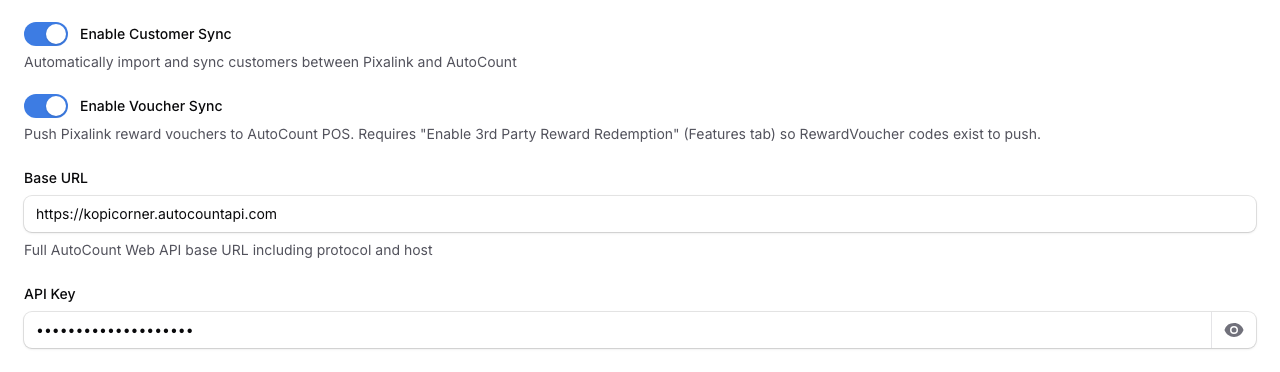
Switches on Enable Customer Sync, and Enable Voucher Sync too if you give out vouchers.

-
Clicks Save changes to finish.
What Your Customers Will See
Your customers see none of this setup. Behind the scenes, their details and purchases move into Pixalink for them. They keep earning points as they spend, and can claim their vouchers at your counter as before.
Good to Know
- These settings sit in Pixalink's internal panel. If something needs changing later, ask your Pixalink contact rather than looking for it in your own Admin Panel.
- Enable Customer Sync is on by default, so members and spending keep flowing in.
- Enable Voucher Sync is off by default, and only works once Enable 3rd Party Reward Redemption is switched on as well. Your Pixalink contact turns both on when you use vouchers. If your vouchers are not reaching your till, this pair is the first thing to ask them to check.
- Your Base URL is the connection web address AgileX provides for your AutoCount system.
- A Connection Successful message should appear before saving.
- The Last Sync Date fills in on its own after the first import. You never need to change it.
Need Help?
Our support team is happy to help you connect AutoCount and run your first import.
What's Next?
- How to Import Customers from AutoCount — bring your members across once connected
- How AutoCount Invoices Become Point-Earning Transactions — how a sale turns into points
- Why Your AutoCount Sale Didn't Earn Points — what to check when points are missing