How to Set Up Member Pricing with Eats365
What Is Member Pricing?
Member pricing lets you offer special prices to your loyalty members at the Eats365 POS. Instead of everyone paying the same price, your loyalty members see a lower price automatically when they identify themselves at the counter.
For example:
- A regular customer pays RM35 for a signature bowl
- Your loyalty member pays RM30 for the same item — no coupon needed, no manual discount
This works because Pixalink tells Eats365 which tier the customer belongs to, and Eats365 applies the right price automatically.
Member Pricing vs Storewide Discount — Which Should I Use?
Pixalink + Eats365 gives you two ways to reward your members at the POS:
| Storewide Discount | Member Pricing | |
|---|---|---|
| What it does | Gives a % off the entire bill | Sets a specific price for each item |
| Example | Gold members get 15% off everything | Gold members pay RM30 instead of RM35 for Item X |
| Best for | Simple, blanket discounts across the menu | Precise control over pricing per product |
| Where to set up | Pixalink Admin Panel > Loyalty Program > Tier Configurations (via the Eats365 Member Plan automation on each tier) | Eats365 Back Office (per item) |
You can use both together. A member could get a storewide 10% discount AND special member prices on selected items.
Already using storewide discounts? See: Eats365 Tier-Based Discount Configuration for that setup.
Before You Start
Make sure you have:
- Eats365 integrated with Pixalink — Your SID and access token must be set up. If not, see: Eats365 SID and Access Token Setup
- Loyalty tiers created in Pixalink — You need at least one tier (e.g., "Member", "Gold", "VIP") set up under Loyalty Program > Tier Configurations
- Customers assigned to tiers — Your customers need to be in a tier for member pricing to work. Customers without a tier will see regular prices.
Step-by-Step Setup
Step 1: Find Your Tier Code in Pixalink
Each tier in Pixalink has a unique code that Eats365 uses to identify which pricing to apply. Here's how to find it:
- Log in to your Pixalink Admin Panel
- Go to Loyalty Program > Tier Configurations
- Click on the tier configuration you want to link to Eats365 member pricing
- In the Tiers table, click the column toggle icon and enable the Tier Code column
- You'll now see a code number next to each tier — this is your Tier Code, a unique identifier that Pixalink uses to communicate with Eats365
- Click the code to copy it to your clipboard
Keep this code handy — you'll need it in the next step.
Step 2: Create a Membership Plan Rule in Eats365
Now switch to your Eats365 Back Office:
- In the sidebar, go to Tier Pricing Preset > Membership Plan Rule
- Click to create a new rule
- Fill in:
- Name — Give it a clear name (e.g., "Gold Member Pricing")
- Code — Any code for your reference
- Under Included Membership Plan, select the membership plan(s) to include
- Under 3rd Party CRM Member Plan Code, click + Add New
- Paste the Tier Code you copied from Pixalink
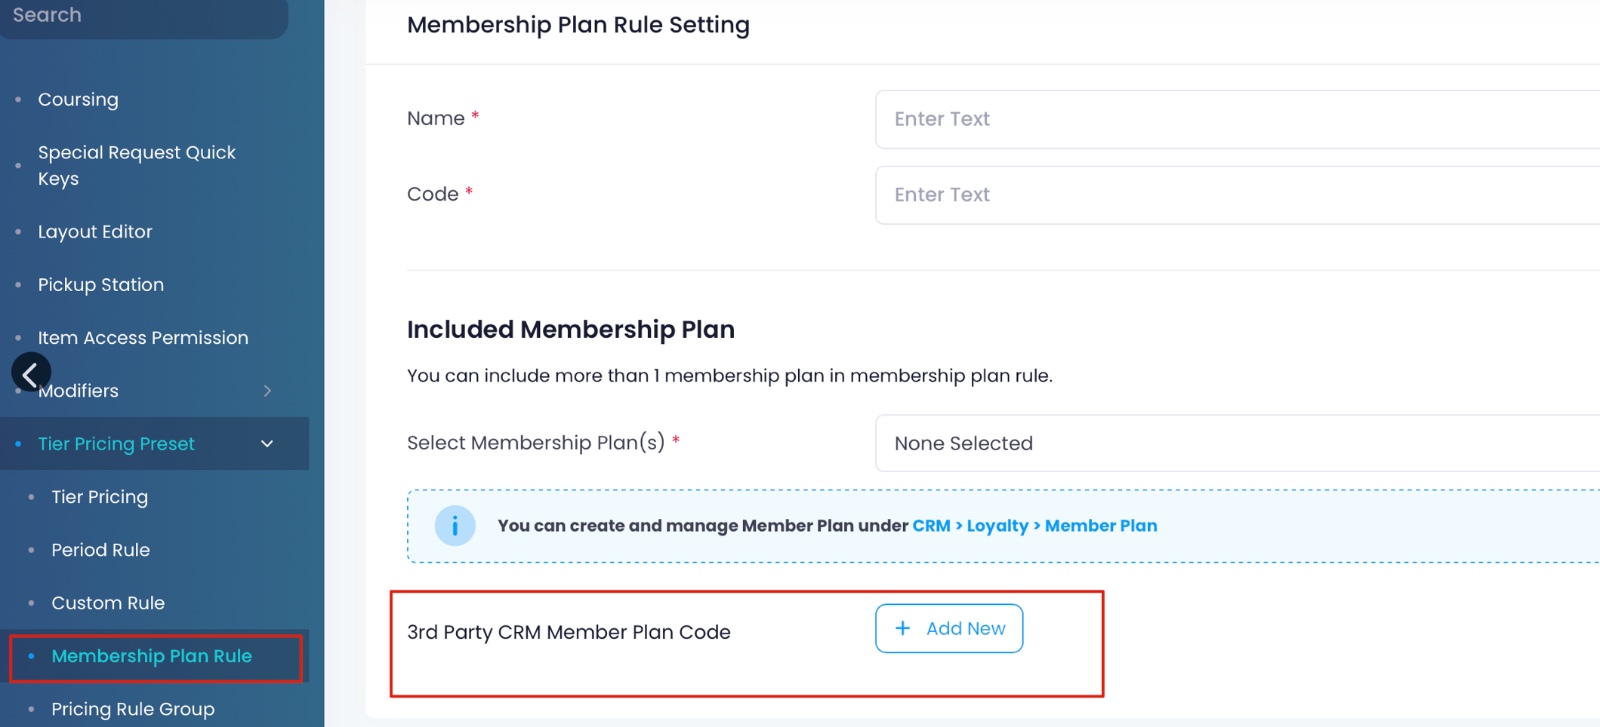
This step is critical. The "3rd Party CRM Member Plan Code" is where you paste the Tier Code from Pixalink. It must exactly match. If the codes don't match, member pricing won't work.
Note: The Eats365 Back Office layout may vary slightly depending on your Eats365 version. If you can't find these options, check with your Eats365 account manager.
Step 3: Set Member Prices on Your Menu Items
Still in the Eats365 Back Office:
- Go to Menu Setup > Item
- Select the item you want to give a member price
- Scroll down to Price Tier
- Select your membership plan from the dropdown (e.g., "Member price")
- Enter the Dine-in and Takeout prices for members
- Click + Add Price Tier if you want to add prices for other membership tiers
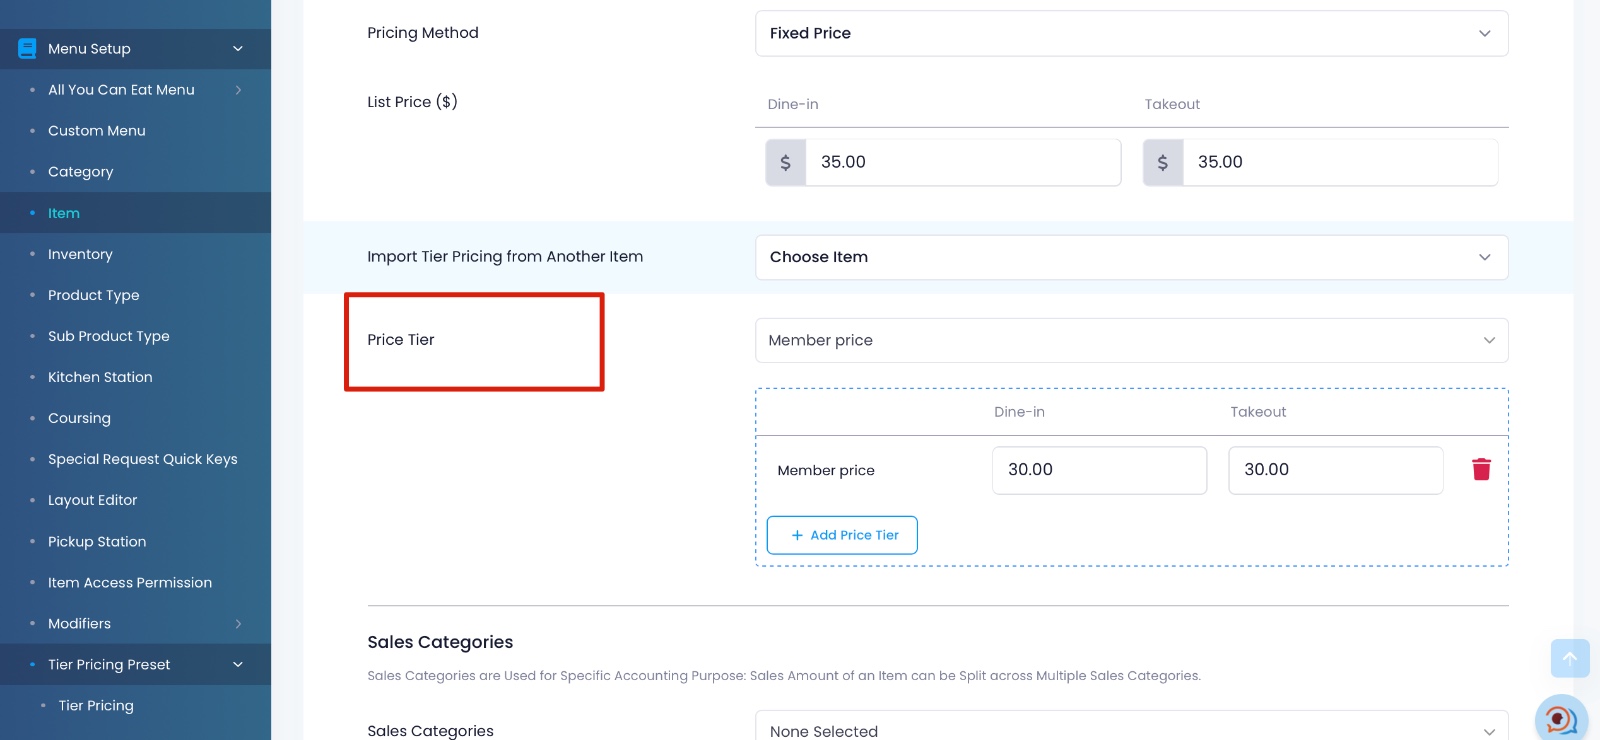
In this example, the regular list price is RM35.00 but members pay RM30.00 — a RM5 saving per order.
Pro tip: Use "Import Tier Pricing from Another Item" at the top to copy pricing from an existing item. This saves time when you're setting up many items.
Repeat this for every item you want to offer at a member price.
Step 4: Test It
- Go to your Eats365 POS
- Look up a customer who has the correct tier in Pixalink
- Add an item that you've configured with member pricing
- The POS should automatically show the member price
If the member price doesn't appear, check the troubleshooting section below.
Example: Setting Up Member Pricing for a Cafe
Let's say you run a cafe and want to reward your loyalty members with better prices on popular items:
| Item | Regular Price | Member Price | Member Saves |
|---|---|---|---|
| Signature Latte | RM18 | RM15 | RM3 |
| Power Smoothie | RM22 | RM18 | RM4 |
| Protein Bowl | RM35 | RM30 | RM5 |
These member prices apply to higher-tier customers (e.g., Gold members). Customers in the base "Member" tier pay the regular price.
Here's what you'd do:
- In Pixalink: Make sure your customers are assigned to a tier (e.g., "Member"). Find the Tier Code from the Tiers table.
- In Eats365: Create a Membership Plan Rule and paste the Tier Code from Pixalink into the "3rd Party CRM Member Plan Code" field.
- In Eats365: Go to each item above and add a Price Tier with the member prices.
- Done! When a member identifies at the POS, they automatically get the lower prices.
Troubleshooting
Member price not showing at the POS? Run through this checklist:
| What to check | How to fix |
|---|---|
| Does the customer have a tier? | In Pixalink, go to Customers and check if the customer has a tier assigned. No tier = no member pricing. |
| Does the code match? | The "3rd Party CRM Member Plan Code" in Eats365 must exactly match the Tier Code shown in Pixalink. Double-check by copying the code again. |
| Is the item configured? | Only items with a Price Tier set in Eats365 will show member prices. Items without it use the regular list price. |
| Is the Eats365 connection working? | Make sure your SID and access token haven't expired. See: Eats365 SID and Access Token Setup |
| Storewide discount not applying? | If you set up member pricing but the storewide % discount isn't working, check that the Eats365 Member Plan automation is configured on the tier. Go to Loyalty Program > Tier Configurations, open the relevant tier configuration, then find the tier row and click the Automations button. This is a separate setup from item-level pricing. |
Still stuck? Contact your Pixalink support team — they can check what data is being sent to Eats365 for your customer.
Things to Keep in Mind
- You choose which items get member prices. Items without a Price Tier configured will use the regular price for everyone — members included.
- Dine-in and takeout can differ. You can set different member prices for dine-in and takeout on the same item.
- Multiple tiers, multiple prices. If you have Silver and Gold tiers, you can set different prices for each — Gold members could pay even less than Silver members.
- Works alongside storewide discounts. Member pricing and percentage-based discounts can work together. Set the percentage in Pixalink, set the item prices in Eats365.
- Changes take effect immediately. Once you save the pricing in Eats365, it applies on the next customer lookup at the POS. No restart needed.
- Your base tier uses regular pricing. The entry-level tier (e.g., "Member" at 0 points) typically pays the regular price — no special member pricing. Member pricing discounts are meant for higher tiers like Silver, Gold, or Platinum, giving customers an incentive to move up.
- Want storewide discounts too? If you also want a percentage discount on the entire bill (not just per-item prices), you'll need to configure the Eats365 Member Plan automation on each tier. Open the tier configuration under Loyalty Program > Tier Configurations, then click the Automations button on the relevant tier row. See: Eats365 Tier-Based Discount Configuration for a step-by-step guide.