Connecting Zeoniq POS with Pixalink Loyalty System
This guide walks you through the steps to integrate your Zeoniq Point of Sale (POS) system with Pixalink's loyalty program.
With this integration, you can:
- Automatically award loyalty points to customers when they make purchases.
- Sync vouchers with Zeoniq POS for seamless redemption at checkout.
Benefits of Integration
| Benefit | Description |
|---|---|
| Automatic Points Awarding | Loyalty points are automatically awarded to customers when transactions are completed in your POS system — no manual entry needed. |
| Voucher Sync | Apply vouchers directly during checkout in Zeoniq POS, without needing the Pixalink backend portal open at the cashier counter. |
| Seamless Customer Experience | Deliver a smoother, more convenient experience for your customers by connecting your sales and loyalty systems. |
Prerequisites
Before you begin, make sure you have the following ready:
- An active Zeoniq POS account
- A CXM License enabled by your Zeoniq key account manager
- An active Pixalink account
- Your CXMID, Merchant Code, and API Key (from the Pixalink dashboard)
- Contact information for your Pixalink account manager
Integration Process
Follow all steps below in order. The typical setup takes 1–2 business days once all credentials are in place.
Step 1: Enable the CXM License in Zeoniq
The 3rd party CRM integration license is required to enable 3rd party CRM integration within Zeoniq POS.
- Contact your Zeoniq key account manager.
- Request to enable the 3rd party CRM integration feature.
- Confirm with your account manager once the license has been activated.
Note: If you are unsure who your Zeoniq key account manager is, contact Zeoniq support directly or reach out to your Pixalink account manager for assistance.
Step 2: Obtain Your Credentials from Pixalink
You will need three pieces of information from your Pixalink dashboard to complete the integration:
| Credential | Description |
|---|---|
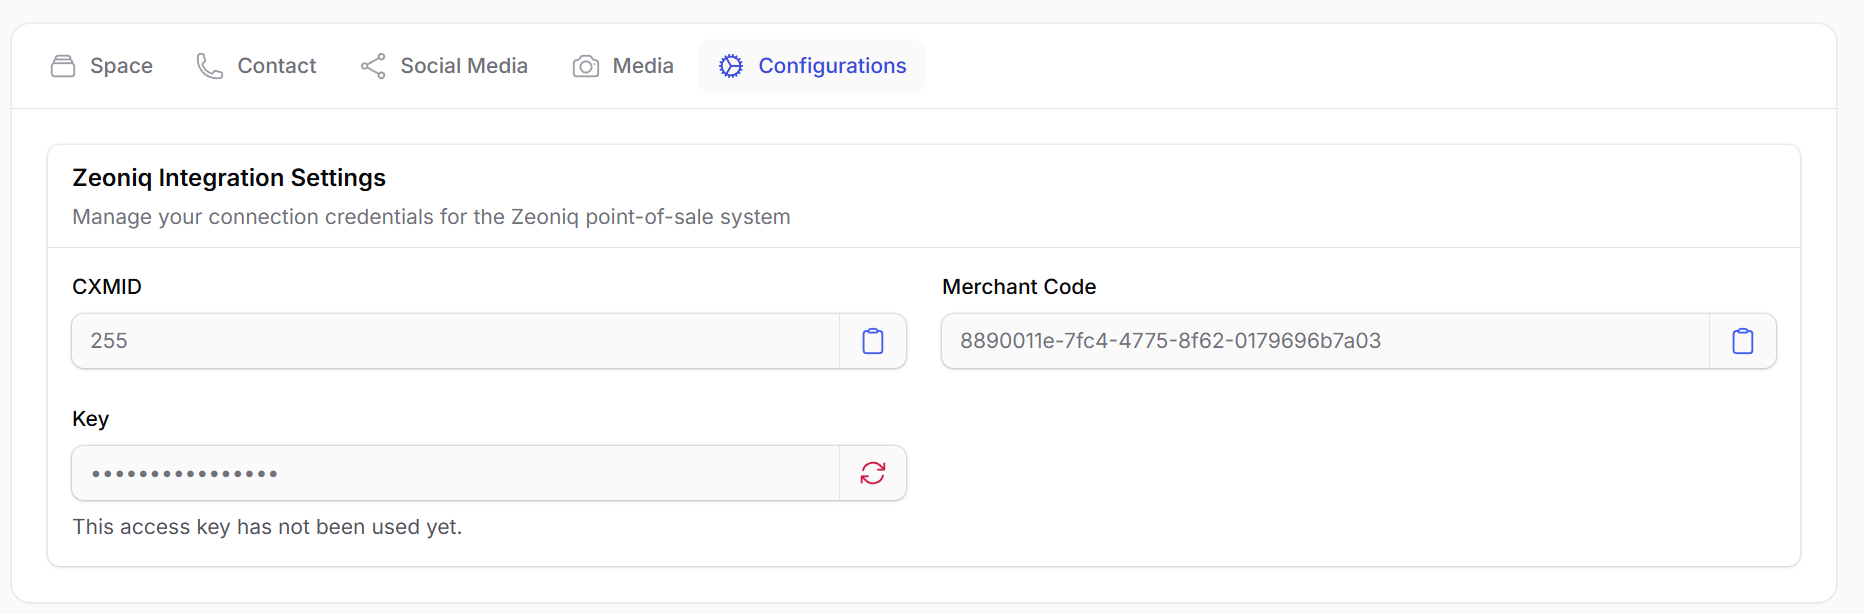
| CXMID | A unique identifier for your CXM integration instance. Found in the CRM Integration section of your Pixalink dashboard. |
| Merchant Code | Your unique Zeoniq restaurant/merchant code that links to your Pixalink space. |
| API Key (Bearer Token) | A personal access token used to authenticate API calls. Found in the CRM Integration section. Click the refresh icon to generate a new one if unavailable. |
To find these credentials, navigate to your Space Settings and open the Configurations tab. You will see the Zeoniq Integration Settings section:
Step 3: Contact Your Pixalink Account Manager
After obtaining your credentials, reach out to your Pixalink account manager to complete the back-end setup.
- Contact your Pixalink account manager.
- Provide your CXMID, Merchant Code, and API Key.
- Request your account manager to assign and configure your restaurant in the Pixalink back office.
- Wait for confirmation that your account has been configured before proceeding.
Step 4: Pass the Key to Your Zeoniq POS Reseller
Once your Pixalink account manager has confirmed the back-end setup, you will need to pass the API key to your Zeoniq POS reseller so they can configure it on the POS side.
Important — Bearer Token Format
When providing the API Key to Zeoniq, you must add the prefix
Bearer(including the space) before the token.Example:
Bearer your-access-token-hereFailing to include this prefix will cause authentication errors.
- Contact your Zeoniq POS reseller or technical support.
- Provide the API Key in the correct format:
Bearer your-access-token-here - Also provide your CXMID and Merchant Code.
- Request the reseller to configure these credentials in the Zeoniq POS integration settings.
Verification
Once all steps are complete, verify the integration is working correctly before going live.
| # | Test | Expected Result |
|---|---|---|
| 1 | Process a test transaction in Zeoniq POS using a registered customer. | Loyalty points appear in the customer's Pixalink account automatically. |
| 2 | Apply a voucher during checkout in Zeoniq POS. | Voucher is validated and applied without opening the Pixalink portal. |
Timeline
The typical integration process takes 1–2 business days once all credentials are in place and both Zeoniq and Pixalink have been notified. No deep technical customization is required for a standard setup.
- Standard integration: 1–2 business days
- Custom configuration (if required): Please discuss with your Pixalink account manager.
Support
If you encounter any issues during the integration process, reach out through the following channels:
- Contact your Pixalink account manager for direct assistance.
- Reach out in your customer support WhatsApp group.
- Contact your Zeoniq POS reseller for POS-side configuration issues.
- Email Pixalink support: info@pixalink.io
Checklist Before Contacting Support
Before reaching out, confirm:
- CXM License is activated in Zeoniq
- CXMID, Merchant Code, and Bearer Token have been shared with all parties
- Pixalink account manager has confirmed back-end setup
- Zeoniq reseller has configured the credentials in POS